When you order a Custom Domain Email Hosting plan from Thexyz, the first step is to prove you own the domain. This is done by adding a DNS verification record to your domain.
Don’t worry, this does not affect your website or existing email, and it usually takes just a few minutes.
Step 1: Open Your Email Service in the Client Area
-
Log in to your Thexyz Client Area
-
Click Services
-
Locate your active Custom Domain Email Hosting service
-
Click View Details
You’ll be taken to the DNS Verification screen.
Step 2: Understand the DNS Record You’re Adding
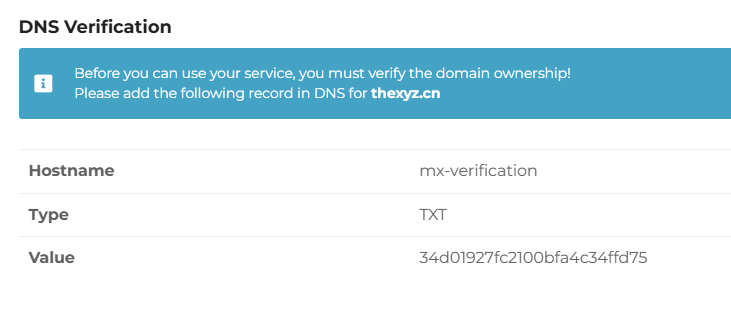
You will see three important fields:
| Field | What it Means |
|---|---|
| Hostname | The name of the DNS record |
| Type | The record type (TXT) |
| Value | A unique verification code |
Example:
-
Hostname:
mx-verification -
Type:
TXT -
Value:
34d01927fc2100bfa4c34ffd75
Important:
This verification record is only for domain ownership validation.
It does not route email and does not replace MX records.
Step 3: Add the TXT Record at Your Domain Registrar
Log in to the company where your domain’s DNS is managed (for example: Namecheap, GoDaddy, Cloudflare, Thexyz DNS, etc.).
Look for DNS Settings, Manage DNS, or Zone Editor.
Add a new DNS record with these settings:
-
Type: TXT
-
Host / Name:
mx-verification -
Value / Content:
34d01927fc2100bfa4c34ffd75 -
TTL:
-
Leave default (or set to Auto)
-
If your DNS provider requires a fully qualified name, it may appear as:
This is normal.
Step 4: Save and Wait for DNS Propagation
-
Most DNS changes are detected within 1–10 minutes
-
In some cases, it can take up to 1 hour
-
Rarely, DNS providers may take up to 24 hours
You do not need to refresh DNS repeatedly, just wait a few minutes before checking again.
Step 5: Complete Verification in the Client Area
-
Return to the DNS Verification page in your service
-
Click Verify DNS (or refresh the page)
Once verified:
-
The warning banner disappears
-
Domain ownership is confirmed
-
Email setup can proceed
Your domain is now validated
Common Issues & Fixes
Verification not detected?
Check the following:
-
TXT record spelling is exact
-
No extra spaces in the value
-
Record type is TXT, not MX or CNAME
-
DNS is added at the correct provider (where nameservers point)
Using Cloudflare?
-
Set the TXT record as DNS only (gray cloud)
-
Proxy does not apply to TXT, but confirm it saved correctly
What Happens Next?
After DNS validation:
-
You’ll be guided to add MX records for mail delivery
-
Optional records (SPF, DKIM, DMARC) can be added for best deliverability
-
Mailboxes can be created and used immediately
Summary
-
DNS verification confirms domain ownership
-
It’s safe and non-disruptive
-
Usually completes in minutes
-
Required before email can be activated
Once this step is done, you’re past the hardest part ????
Your custom email is almost ready.
