Email aliases are excellent tools for organizing your inbox, filtering spam, and protecting your primary email address. Whether you want a dedicated address for online shopping, newsletters, or billing, Thexyz makes it simple to set up and manage custom aliases.
Here is a step-by-step guide on how to create, manage, and upgrade your email aliases within Thexyz Client Area.
Step 1: Log in to the Client Area
To get started, navigate to the Thexyz login page and access your account: https://www.thexyz.com/account/login
Step 2: Access Your Email Services
Once you are logged into the dashboard:
-
Click on Services in the main navigation menu.
-
Locate your Thexyz Email service from the list of your products.
-
Click the Active button next to it to open your email management settings.
Step 3: Create a New Alias
Scroll down to find the Create Alias section. You will see an indicator showing how many aliases you are currently using (e.g., "1 / 25 used").
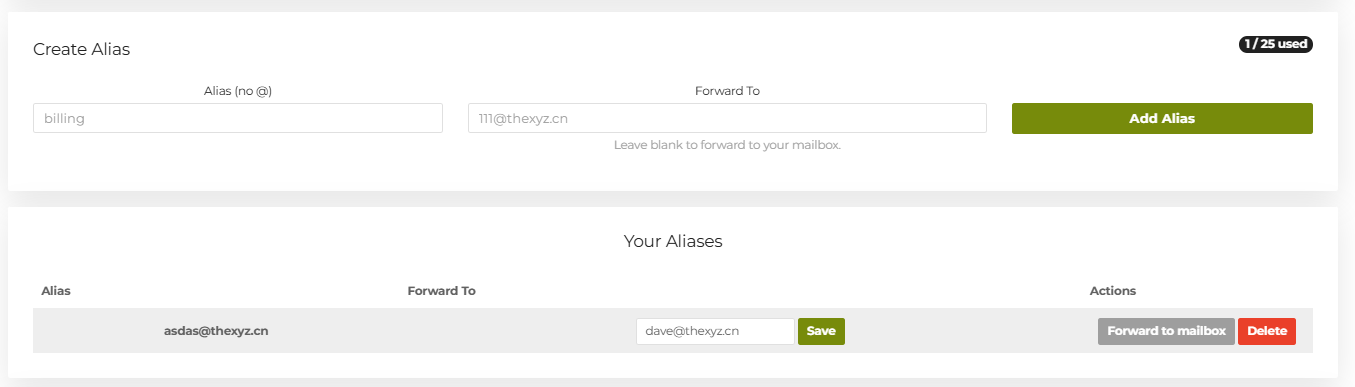
-
Alias (no @): In the first text box, enter the prefix you want for your new alias (for example, type
billingif you want the alias to be billing@yourdomain.com). -
Forward To: In the second box, type the destination email address where you want the alias to send its messages (e.g.,
111@thexyz.cn). Tip: If you want the emails to go straight to your primary mailbox associated with this domain, simply leave this box blank. -
Click the green Add Alias button to activate it.
Step 4: Managing Your Existing Aliases
Right below the creation area, you will find the Your Aliases section, which lists all of your currently active aliases. From here, you can easily manage them:
-
Edit Forwarding: You can change the destination address in the "Forward To" field at any time and click the green Save button.
-
Quick Actions: Use the gray Forward to mailbox button to quickly route the alias back to your main inbox, or click the red Delete button to permanently remove an alias you no longer need.
Upgrading Your Alias Limits
If your business is growing or you like to meticulously organize your incoming mail, you might hit your default alias limit (such as 25 aliases).
If you need more storage or additional aliases, you can easily expand your capacity:
-
Navigate to your Upgrade Options within the service management page.
-
Look for the Total Aliases row.
-
Click the dropdown menu to select a new tier. You can upgrade to larger packages such as 100 aliases, 500 aliases, or an Unlimited alias plan.
-
Once you have selected your desired upgrade, click the green Click to Continue >> button to proceed to checkout and apply the new limits to your account.

