How to Set Up Thexyz Classic Email With Your Own Domain
With Thexyz Classic Email, you can host professional email using your own domain name (for example: you@yourdomain.com). Your domain does not need to be registered with Thexyz to use our email service. As long as you control the DNS for your domain, you can connect it to your email hosting account by updating a few DNS records.
If your domain is registered with another registrar or DNS provider, simply follow the steps below to update your records. Once configured, you will be able to send and receive email using your domain through Thexyz Classic Email.
If you do not currently have a domain name, you can register a domain with Thexyz and connect it to your email hosting plan automatically.
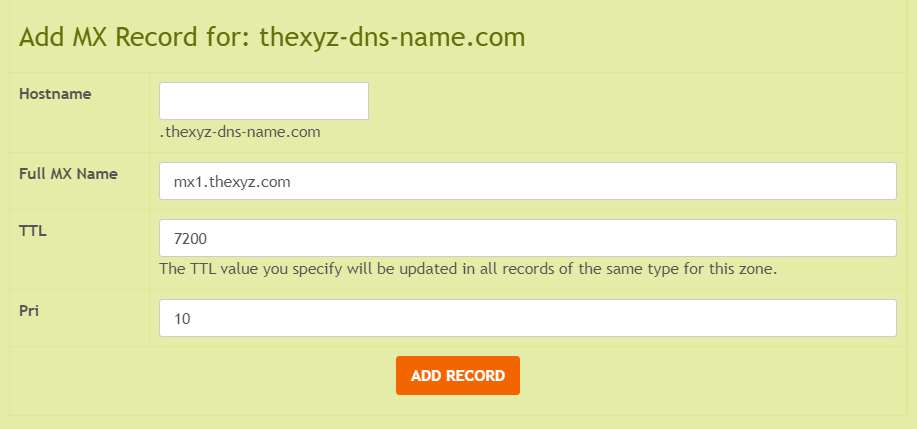
1. Update Your MX Records (Required)
MX records tell the internet where email for your domain should be delivered. To use Thexyz Classic Email, you must update your domain's MX records to point to our email infrastructure.
Log in to your domain registrar or DNS hosting provider and replace any existing MX records with the following:
| MX Server | Priority | TTL |
|---|---|---|
| mx1.emailsrvr.com | 10 | Lowest possible or 7200 |
| mx2.emailsrvr.com | 20 | Lowest possible or 7200 |
Important: Delete any existing MX records before adding the above records. Having multiple MX configurations can prevent email from being delivered correctly.
Need help editing DNS records? See our guide: Editing your domain DNS records .
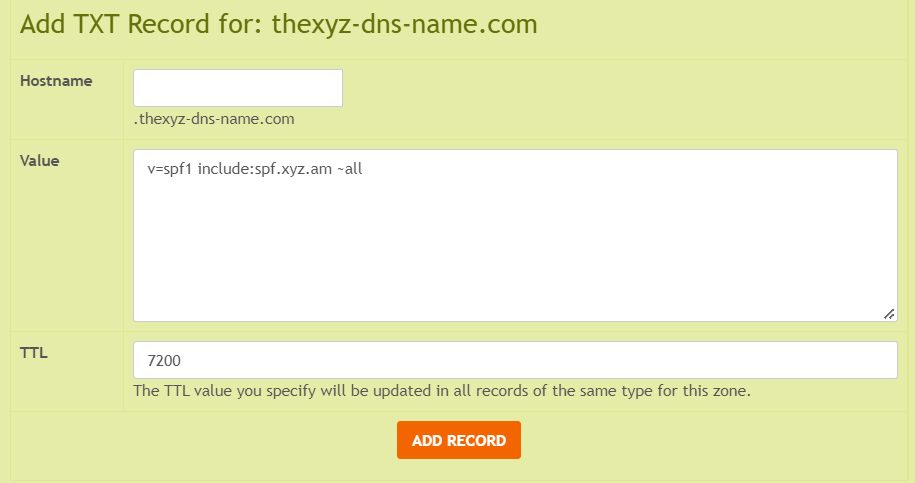
2. Add an SPF Record (Recommended)
SPF (Sender Policy Framework) helps prevent your domain from being used for spam or spoofing and improves email deliverability.
To add SPF, create a TXT record in your domain's DNS settings with the following values:
Record Type: TXT
Host: @ (or leave blank depending on your DNS provider)
Value: v=spf1 include:emailsrvr.com ~all
TTL: 7200 (or default)
This record authorizes Thexyz Classic Email servers to send email on behalf of your domain.
3. Enable DKIM Authentication (Recommended)
DKIM adds a cryptographic signature to your outgoing email, helping receiving mail servers verify that the message was sent by your domain and has not been modified.
To enable DKIM:
- Log in to the Email Administration Portal
- Navigate to your domain settings
- Generate your DKIM key
- Add the provided DNS TXT record to your domain
Email Admin Portal:
https://admin.thexyz.com
Step-by-step guide:
4. Configure Autodiscover (Optional)
Autodiscover allows email clients such as Outlook, Apple Mail, and mobile devices to automatically configure your mailbox using just your email address and password.
To enable autodiscover, add the following DNS record:
Record Type: CNAME
Host: autodiscover
Points To: autodiscover.emailsrvr.com
TTL: Lowest possible or 7200
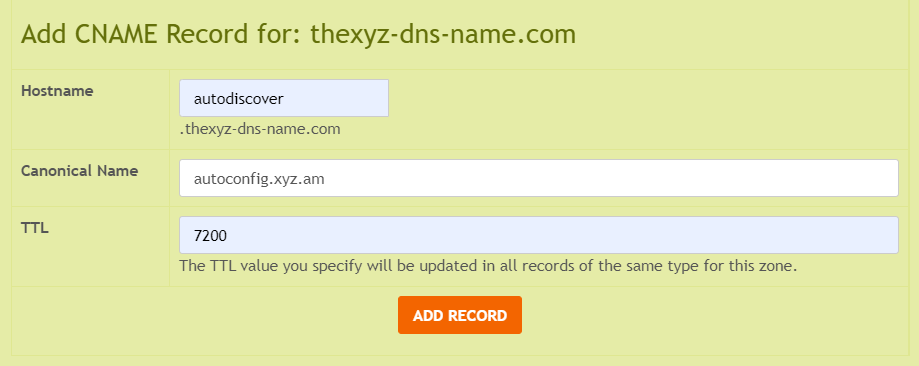
Note: Some DNS providers require the full hostname. For example, if your domain is example.com, the record may need to be entered as autodiscover.example.com.
