Microsoft Outlook does not natively support CalDAV calendars. To keep your Thexyz Email calendar synced with Outlook, you can use Outlook CalDAV Synchronizer — a free, open-source plugin that provides reliable two-way calendar synchronization.
This guide walks you through setting it up step by step.
What You’ll Need
-
A working Thexyz Email mailbox
-
Microsoft Outlook (Windows)
-
Internet access to install the plugin
Step 1: Download and Install Outlook CalDAV Synchronizer
-
Visit the official Outlook CalDAV Synchronizer website or GitHub page
-
Download the latest stable version
-
Run the installer and follow the on-screen instructions
-
Restart Outlook after installation to activate the plugin
Step 2: Find Your Thexyz CalDAV Calendar URL
-
Log in to Thexyz Webmail
-
Open the Calendar
-
Locate the calendar you want to sync
-
Open the calendar’s settings or options
-
Copy the CalDAV URL
(You’ll need this in the next step)
Each calendar has its own CalDAV URL. Make sure you copy the correct one.
Step 3: Open the CalDAV Synchronizer in Outlook
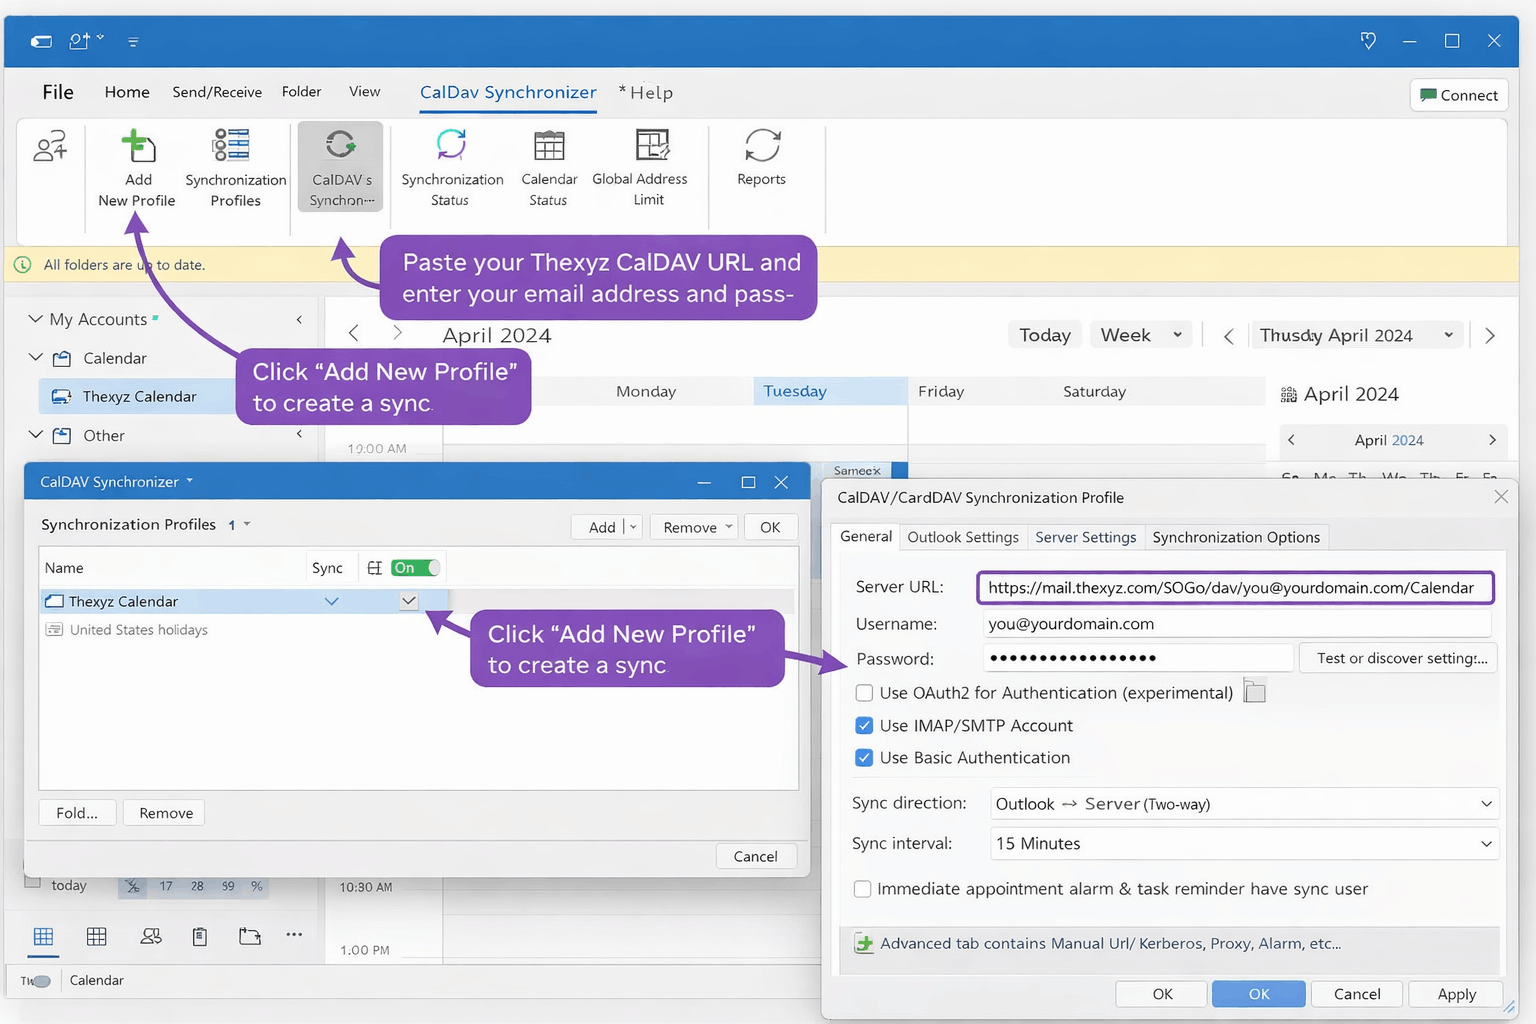
-
Open Microsoft Outlook
-
In the top toolbar, click CalDAV Synchronizer
-
Select Synchronization Profiles
-
Click Add New Profile
-
Choose Generic CalDAV/CardDAV
Step 4: Configure the Synchronization Profile
General Settings
-
Profile name:
Example:Thexyz Calendar
Outlook Folder
-
Choose the Outlook calendar to sync with
-
You may create a new calendar folder to keep things organized
Server Settings
-
Server URL:
Paste the CalDAV URL from Thexyz Webmail -
Username:
Your full email address (example:you@yourdomain.com) -
Password:
Your Thexyz Email password -
Authentication:
✔ Enable Basic Authentication
Sync Options
-
Sync direction: Two-way (recommended)
-
Sync interval:
Example: every 15 minutes
Step 5: Start the Sync
-
Click OK to save the profile
-
Select your new profile in the CalDAV Synchronizer window
-
Click Start Sync
⏳ The first sync may take a few minutes, depending on how many events you have.
Step 6: Verify Everything Is Working
-
Open Calendar in Outlook
-
Confirm your Thexyz events appear in the selected calendar
-
Test both directions:
-
Add or edit an event in Outlook
-
Add or edit an event in Webmail
-
-
Confirm the changes sync both ways
Optional Settings (Advanced Users)
-
Conflict resolution: Choose which side wins if changes conflict
-
Logging: Enable detailed logs for troubleshooting
-
Filters: Limit date ranges or specific event types
Troubleshooting Tips
Calendar not syncing?
-
Double-check the CalDAV URL
-
Confirm your email address and password
-
Make sure Outlook was restarted after installation
Duplicate events?
-
Enable deduplication in the plugin settings
Sync is slow?
-
Reduce sync frequency
-
Limit the date range being synced
Seeing errors?
-
Review logs in the CalDAV Synchronizer settings for details
