You can easily create new mailboxes for your domain directly from the Thexyz Client Area. This allows you to add new email users, set mailbox storage limits, and manage credentials, all without technical setup.
This guide walks you through the process step by step.
Before You Begin
-
You must have an active Email Hosting service with Thexyz
-
Your domain must already be added and verified
-
You must be logged in to the Client Area as the account owner or administrator
Step 1: Open Your Email Service
-
Log in to the Thexyz Client Area
-
Click Services
-
Select your active Email Hosting service
-
Click Accounts
This section shows all existing mailboxes for your service.
Step 2: Click “Add Mailbox”

-
In the Accounts section, click Add Mailbox
-
The “Create new account” form will appear
Step 3: Fill in the Mailbox Details
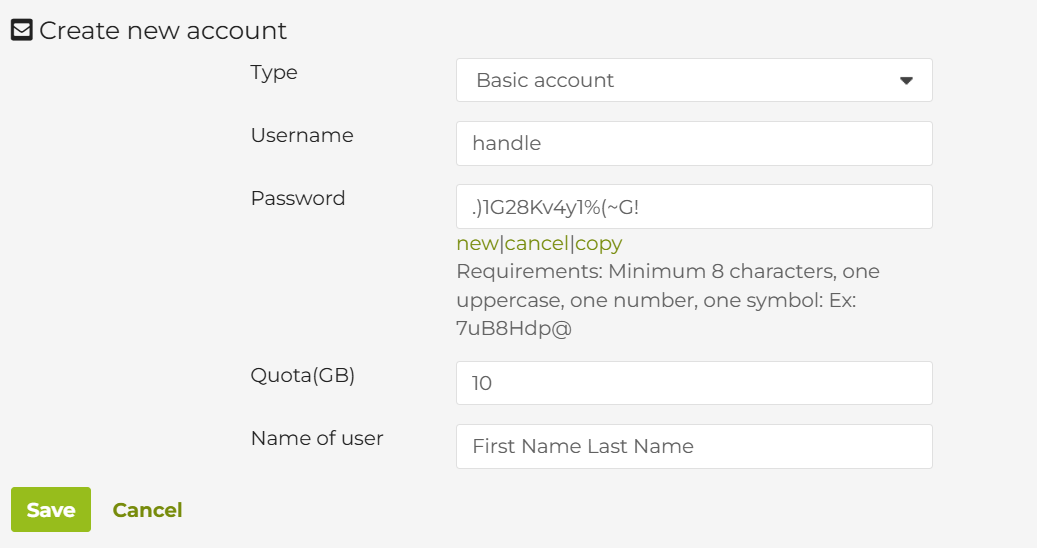
Complete the following fields:
Type
-
Leave this set to Basic account unless you wish to create an enhanced account.
Username
-
Enter the mailbox name (for example:
info,sales,john) -
This becomes the email address:
username@yourdomain.com
Password
-
Enter a strong password, or use the New option to generate one
-
Password requirements:
-
Minimum 8 characters
-
At least one uppercase letter
-
One number
-
One symbol
-
You can use:
-
New – generate a secure password
-
Copy – copy the password for sharing securely
Quota (GB)
-
Set the storage limit for this mailbox
-
Example:
10= 10 GB of mailbox storage -
This must fit within your plan’s total available storage
Name of User
-
Enter the full name of the mailbox user
(example: John Smith) -
This name appears in email clients and messages
Step 4: Save the Mailbox
-
Click Save to create the mailbox
-
The mailbox is created instantly and ready to use
The user can now log in to:
-
Webmail
-
Email apps (IMAP / SMTP)
-
Mobile devices
Need More Mailboxes?
If you’ve reached the maximum number of mailboxes included in your plan:
-
Look to the right sidebar in your service page
-
Click Upgrade / Downgrade Options
-
Choose a plan with:
-
More mailboxes
-
Additional storage
-
-
Complete the upgrade
You can then return to Accounts → Add Mailbox to create additional users.
