Once a custom incoming or outgoing log search has been run, an Email Scout Report (ESR) can be set up which contains the results of the log search and can be scheduled to be sent to a specific recipient or to all mailboxes in the domain. An ESR can be set up to run straight away, at a scheduled date and time or periodically, at a scheduled date and time.
If catch-all is detected on your destination mail server, the Protection Reports will not send.
Create Custom Email Scout Reports
For delivery right away or at a given time
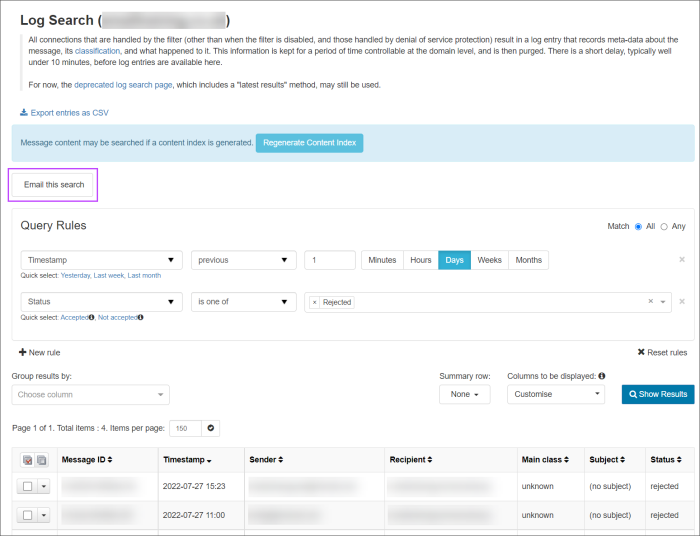
- In the Admin or Domain Level Control Panel, click on Incoming > Logs or Outgoing > Logs
- Using the filters in the Query Rules panel, narrow down what log search data you want to display in the results
- Click on Show Results to display messages matching the query rules
- Click on Email me this report above the Query Rules panel
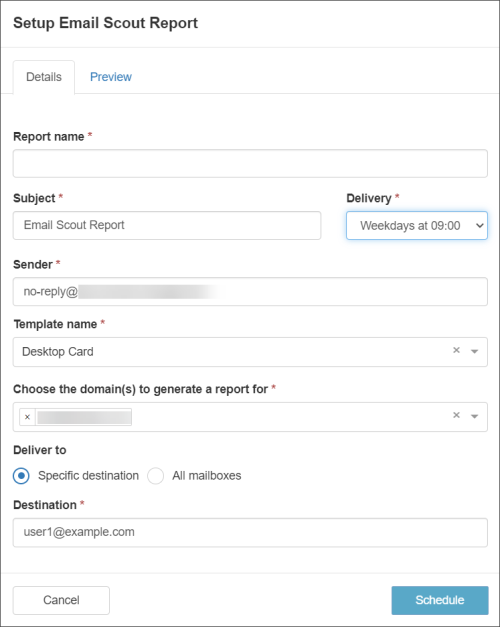
- The Setup Email Scout Report dialog is displayed in the Details tab. In the Subject field enter the subject for the report: this will be the subject of the report email received by the user
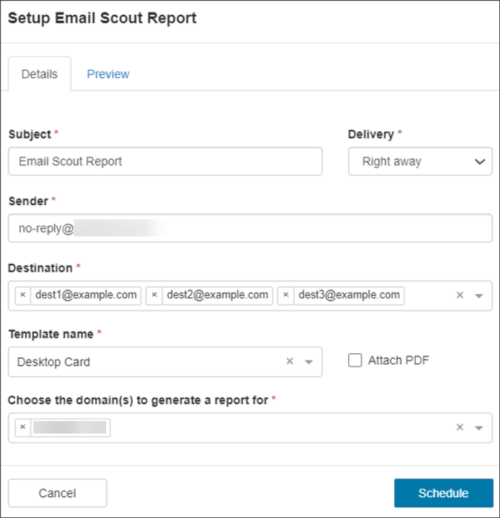
The option to Attach a PDF is available.
- From the Delivery dropdown, choose from the following options whether you want to create and send the report immediately or at a given date and time:
- Right away - Send the report to the specified recipient(s) immediately (one time only)
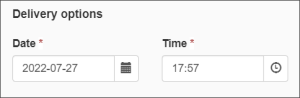
- At given time -Specify a date and time to send the report to the specified recipient(s) (one time only)
- Enter the sender you want to be displayed in the Sender field of the email


The sender should be a valid sender address such as no-reply@antispamcloud.com or a valid mailbox at the domain.
- Enter the report recipient(s) in the Destination field
The recipient must be a valid recipient email address, e.g. john.smith@domain1.net
- Select the template to apply in the Template name field
- Enter the report recipient(s) in the Destination field
You can create your own Email Scout Report templates to define your report format.
- If you wish to receive a PDF version of the report as well as the email, tick Attach PDF
- If adding the Email Scout Report at the Admin level, you must select the Domain(s) the report must be scheduled for
- Click on Schedule
- If you wish to receive a PDF version of the report as well as the email, tick Attach PDF

The newly created report will be emailed to the recipient as directed
For delivery on Weekdays, Every Day, on Repeat, or Advanced
- In the Admin or Domain Level Control Panel, click on Incoming > Logs or Outgoing > Logs
- Using the filters in the Query Rules panel, narrow down what log search data you want to display in the results
- Click on Show Results to display messages matching the query rules
- Click on Email me this report above the Query Rules panel
- The Setup Email Scout Report dialog is displayed in the Details tab. In the Subject field enter the subject for the report: this will be the subject of the report email received by the user
- From the Delivery dropdown, choose from the following options whether you want to create and send the report immediately, or at a given date and time, or create a scheduled report:
- Weekdays at 09:00 - Send the report to the specified recipient(s) every weekday at 9am
- Every day at 09:00, 12:00 and 16:00 - Send the report to the specified recipient(s) every day at 9am, 12 noon and 4pm
- Repeat - Schedule the report to send to the specified recipient(s) using a variety of frequency options:
- Daily
- Once a day
- At the specified time
- Multiple times a day
- Every X minutes or hours
- Starting at the specified time
- Only on weekdays
- Skip sending if there are no results
- Once a day
- Weekly
- Select the days to send the report to the specified recipient(s)
- At the specified time
- Skip sending if there are no results
- Monthly
- Select the day of the month to send the report to the specified recipient(s)
- At the specified time
- Skip sending if there are no results
- Daily
- Advanced - Specify your advanced repeat schedule (in a 'crontab' style format)
Field Accepted values Minute 0-59 Hour 0-23 Day 1-31 Month 1-12 Weekday 1-7 (where 7 is Sunday) 
- Enter the sender you want to be displayed in the Sender field of the email


The sender should be a valid sender address such as no-reply@antispamcloud.com or a valid mailbox at the domain.
- Select the template to apply in the Template name field
You can create your own Email Scout Report templates to define your report format.
- Under the Deliver To section, select either:
- Specific destination
The recipient must be a valid recipient email address, e.g. john.smith@domain1.net
- All Mailboxes
- An option to Include shared mailboxes will be displayed when this is selected. Tick this to also send the ESR to Shared Mailboxes
- An Exclude Mailboxes box will be displayed when this is selected. Using the dropdown, select any mailboxes you do not want to receive the report
- Specific destination
- Click on Schedule
- Under the Deliver To section, select either:
The newly created report will be emailed to the recipient on the date and time specified.
Additional fields
If setting up a report at the Admin Level Control Panel, the following additional field is available:
- Choose the domain(s) to generate a report for - choose one or more domains to configure this report for. The report will include mail filtered for all mailboxes in the listed domain(s)
Enable Automatic Email Scout Reports
Automatic Email Scout Reports can be enabled in the Admin Level Control Panel in Incoming > Domain Settings by enabling Automatically Enable Daily Email Scout Reports.
Automatic Email Scout Reports will not be sent to Shared Mailboxes or Distribution lists.
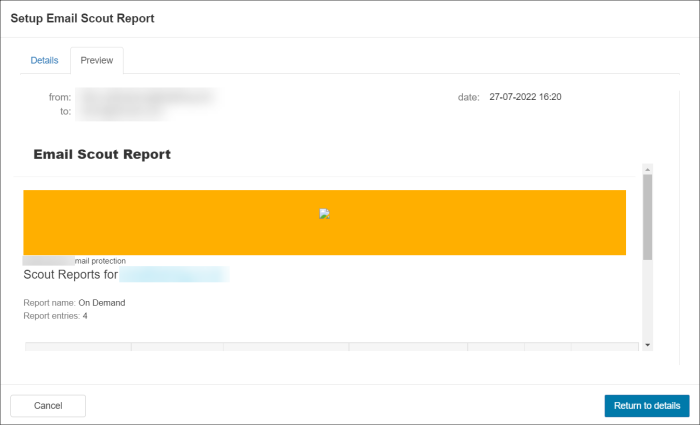
Preview
To preview the Email Scout Report, you can do this when configuring the report, or by editing an existing report.
When Configuring
- In the Domain Level Control Panel, click on Incoming > Logs or Outgoing > Logs
- Configure the report as above
- Select the Preview Tab

Email content
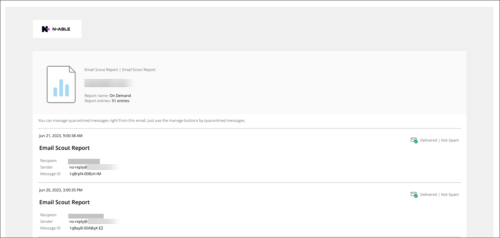
The Email Scout Reports email contains a list of emails that match the report filters you specified in your log search.

The subject line may contain a link. When clicked this will open a web page in your browser containing the message content.

In this page you can:
- View the message as Plain text or Raw (which displays the message headers)
- Use the Available Actions dropdown to perform the following:
- Block list Sender
- Release
- Allow list Sender
- Remove
- Release and Train
- Unsubscribe
Actions that can be carried out by users on messages in the Protection Reports and Email Scout Reports can be configured in Manage Domain Report Actions. If actions are not available to you, check with your Admin that the correct actions are configured.
Once you have created your Email Scout report, it is listed in the Reporting > Email Scout Reports page
