With
the evolution of app development, one
of the most popular dev tools – Git, which every 4 out of 5
developers will expect you to provide, is now enabled on on Thexyz Servers.
What is Git?
Git was created
by Linus Torvalds who is also the author of the Linux kernel. Git is a basically a
distributed version control system used for software development
purposes.
Linus jokingly named it “Git” – a British slang word for an “unpleasant person”.
As
a version control system, Git manages and stores revisions for all types
of projects, including code files, text, image, etc. It keeps “snapshots” of every change in the project’s history, so you will not risk overwriting.
This way, there will be no need for a developer to make a new server connection for every single change they make.
What is Git mostly used for?
A developer would often use Git to set up a preview version of the
website or app they are working on to test them out on the
production server, or even on a different test/staging server.
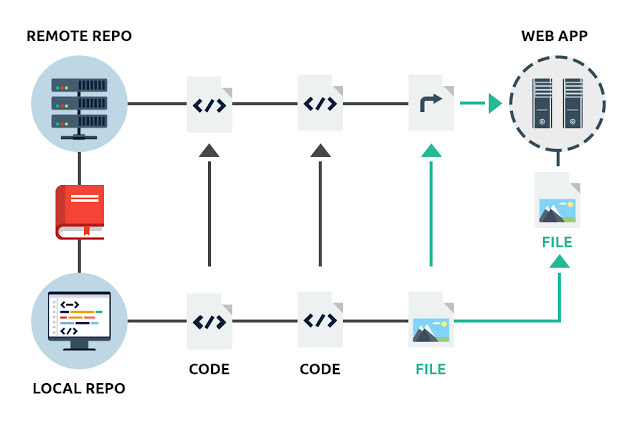
To
use Git on a web server for testing purposes, a developer will need to
first create a Git repository on their local machine and then set up a
cloned Git repository on the server.
Using Git repository hosting platforms like GitHub, developers can test their projects in a web-based graphical environment:

With
Git enabled on our web hosting platform, developers will be able to
push, pull or clone their projects from GitHub, or any other platform
that’s hosting their repository, to one or more web hosting accounts on
our servers. This is all best done over SSH, which opens a secure connection and executes Git operations on the server as required.
The
use of SSH eliminates the need for deploying a daemon service on the
server to push requests, which is one of the main security concerns of
web hosts.
Using Git to deploy a simple script or an entire app on
a web hosting server is a fast and easy way to spread that version
controlled content over a few web hosting accounts at the same time.
This
will save developers all the hassle of uploading the content to all the
accounts successively over FTP. The same holds true for updates –
instead of having to use FTP to upload script or app updates to each web
hosting account separately, the developer will just need to push an
update from the Git repository with a simple Git+SSH command.
How to create a Git repository on a web server?
With
Git now supported on our web hosting platform, you will be able to
create your own repository directly on the server where your websites
are located, instead of using third-party services like GitHub.
First of all, you will need to have SSH access enabled for your web hosting account.
We include SSH access by default with the Enterprise and with all VPS and dedicated server solutions on our platform. With all other packages, SSH is available as an upgrade.
Here,
we’ll examine a very basic Git repository usage scenario that will
allow us to track and deploy a local (as in residing on our workstation)
copy of a dev app in our production environment on the hosting web
server.
Step 1: Prepare the remote (web server) Git and SSH environments
Let’s
assume that our production app directory resides in
~/www/my-domain.tld/ and that our Git repository is located in
~/git_repos/my_app/.
We need to execute the following in our web server environment:
$ ssh username@my-domain.tld -p 2222 After you supply your password and are logged in, you may proceed with:
$ mkdir -p ~/git_repos/my_app
$ cd ~/git_repos/my_app
$ git init
This will initiate the Git repository and will allow us to take advantage of all the ‘goodies’ that the Git tool suite provides.
Now we need to tell Git to accept pushes to our working directory (~/www/my-domain.tld/):
$ git config receive.denyCurrentBranch ignore The next step is to create a post-receive hook that will help us deploy my_app’s code directly into our working directory:
$ editor_of_your_choice ~/git_repos/my_app/.git/hooks/post-receive Fill the file with the following contents:
#!/bin/sh
GIT_WORK_TREE=~/www/my-domain.tld/ git checkout -f
Save it and make the hook file executable:
$ chmod 0750 ~/git_repos/my_app/.git/hooks/post-receive And a small step that will help us set up SSH:
$ mkdir -m 0700 ~/.ssh/
$ touch ~/.ssh/authorized_keys
$ chmod 0600 ~/.ssh/authorized_keys
Step 2: Prepare the local (workstation) Git and SSH environments
Let’s
assume that the app you’re developing resides in ~/projects/my_app/ and
contains only one example file: index.php – we’ll set up a Git
repository in the same directory:
$ cd ~/projects/my_app/
$ git init $ git add index.php
$ git commit -m 'initial version'
$ git remote add origin username@my-domain.tld:git_repos/my_app
We need to generate a cryptographically strong SSH public/private key pair:
$ ssh-keygen -t rsa -b 4096 This will create two files: ~/.ssh/id_rsa (private key) and ~/.ssh/id_rsa.pub (public key).
Create a ~/.ssh/config file and add the remote host info:
Host my-domain.tld
Port 2222
PreferredAuthentications publickey,password
If you already have this file, you only need to update it using the information above.
Now add the SSH public key to the production environment:
$ cat ~/.ssh/id_rsa.pub | ssh username@my-server.tld "cat >> ~/.ssh/authorized_keys"Step 3: Deploy your app’s code to production
Now we only need to push my_app’s code into production via Git:
$ git push -u origin master. That’s it! Your app (index.php in this example) is now deployed on the remote web server in the ~/www/my-domain.tld/ directory.